
What is a Magnetic Rail Tracking Light System?
Definition and Working Principle
A magnetic rail tracking light system is a revolutionary architectural lighting solution that combines aesthetic minimalism with unparalleled functional flexibility. Unlike traditional track lighting that relies on mechanical clips or screws, this system utilizes magnetic attraction to secure light fixtures within an aluminum profile.
The working principle is elegantly simple: the track is energized with a safe DC48V low-voltage current. Each light module is equipped with a powerful permanent magnet and copper contact points. When a fixture is inserted into the rail, the magnetic force creates a secure physical bond while simultaneously establishing an electrical connection. This allows users to move, swap, or add lights instantly without the need for specialized tools or electrical expertise.
Core Components of a Magnetic Lighting System
To build a high-performance magnetic tracking system, four essential elements must work in harmony:
- The Magnetic Track (Rail Profile): An extruded aluminum housing that contains the internal copper conducting strips and the magnetic surface.
- LED Light Modules: A diverse range of fixtures—including spotlights, linear lights, and pendants—designed with magnetic adapters.
- External or Internal Power Drivers: Transformers that convert standard AC power into the DC48V required for the system.
- System Connectors: Specialized joiners (L, T, or X shapes) that allow the track to transition between walls and ceilings, creating a continuous flow of light.
This modular architecture ensures that the lighting design can evolve alongside the interior space, making it a preferred choice for high-end residential, retail, and gallery environments.
Key Advantages of Magnetic Track Lighting
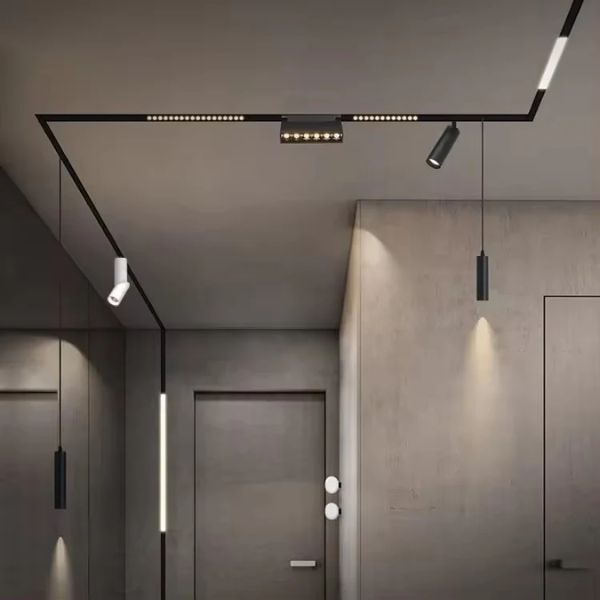
Magnetic track lighting has redefined interior illumination by combining minimalist aesthetics with high-performance functionality. Unlike traditional systems, these rails allow for a truly modular approach, making them the preferred choice for modern residential and high-end commercial projects.

Design Flexibility and Versatility
The standout feature of this system is the ability to move, add, or swap fixtures in seconds. You are never locked into a single lighting layout. Whether you need to highlight a new piece of furniture or require precise track lighting for museums to showcase artwork, the magnetic connection allows for instant reconfiguration. This versatility ensures your space can evolve without needing a complete electrical overhaul.
Low Voltage Safety (DC48V)
Safety is at the core of the magnetic rail design. These systems typically operate on DC48V low voltage, which provides several critical benefits:
- Touch-Safe: The voltage is low enough that there is no risk of electric shock, even if you touch the track while it is powered.
- Stability: DC48V minimizes voltage drop over long distances compared to lower voltage alternatives.
- Durability: Lower heat generation leads to a longer lifespan for both the LED chips and the internal components.
Tool-Free Installation and Maintenance
Once the magnetic rail is installed and powered, managing your light fixtures is completely tool-free. The magnetic suction mechanism holds the modules securely in place while maintaining a constant electrical connection.
- DIY Friendly: Users can slide or snap fixtures into place without calling an electrician.
- Lower Upkeep: Replacing a module or changing a beam angle takes seconds, significantly reducing long-term maintenance labor.
- Clean Aesthetic: No bulky clips or visible mounting hardware, just a sleek, integrated look.
Types of Magnetic Track Rail Profiles
Selecting the right profile is a critical step in any magnetic rail tracking light buying guide. The track profile you choose dictates the final aesthetic of your space and the complexity of the installation process.
Recessed Tracks for a Minimalist Finish
Recessed tracks are the gold standard for high-end, modern interiors. These are designed to be embedded into the ceiling or wall, with the flanges plastered over to create a “trimless” look.
- Visual Impact: The track appears as a clean, integrated architectural slot.
- Best For: New construction or major renovations where you want a seamless finish.
- Advantage: It completely hides the hardware, leaving only the light modules visible.
Surface Mounted Track Rails
If you are retrofitting a space or working with solid concrete ceilings, surface-mounted rails are the most practical solution. These are screwed directly onto the ceiling surface without the need for cutting large channels.
- Ease of Use: Significant reduction in labor costs and installation time.
- Design: While visible, the slim profile maintains a sleek, industrial-chic vibe.
- Durability: Just as robust as our specialized waterproof LED fixture selections, these rails provide a stable foundation for any lighting layout.
Suspended Magnetic Rail Systems
For spaces with high ceilings, suspended systems use aircraft cables to hang the track at a specific height. This is particularly effective for task lighting over dining tables, kitchen islands, or office workstations.
- Functionality: Brings the light closer to the working plane, improving illumination levels.
- Customization: You can adjust the suspension height to match the scale of the room.
- Planning: Much like designing optimale garagenbeleuchtung for maximum visibility, suspended rails allow you to define zones within a large, open-concept area.
| Profile Type | Installation Method | Aesthetic Style |
|---|---|---|
| Recessed | Integrated into drywall | Invisible / Minimalist |
| Surface | Screwed to ceiling | Modern / Industrial |
| Suspended | Hanging cables | Architectural / Floating |
Compatible LED Fixtures for Magnetic Rails
The true strength of a magnetic system lies in its versatility. Unlike traditional tracks, I design these systems so you can mix and match different light heads in seconds without turning off the power. Whether you need focused task lighting or soft ambient glows, the fixture options are extensive.
Magnetic Spotlights and Floodlights
These are the most popular choices for creating layers of light. I recommend using **magneticmagnetic spotlights when you need to highlight artwork or architectural features, as they usually come with adjustable heads and narrow beam angles. Magnetic floodlights, on the other hand, use a frosted cover to spread light evenly across a room.
- Spotlights: Best for accent lighting with beam angles from **15° to15° to 36°.
- Floodlights: Ideal for general illumination and reducing harsh shadows.
Linear Light Modules and Grille Lights
For a clean, minimalist aesthetic, linear modules are the way to go. These fixtures sit flush or near-flush within the rail. Our flexible magnetic track light modules include both opal diffusers for a continuous “line of light” and grille lights (also known as dot lights).
- Linear Lights: Provide a smooth, wide-angle wash of light for hallways and offices.
- Grille Lights: Feature recessed LEDs that significantly reduce glare (low UGR), making them perfect for workspaces or lounges where eye comfort is a priority.
Decorative Magnetic Pendant Lamps
You don’t need a separate junction box to hang a pendant anymore. With magnetic systems, you can simply click a decorative pendant lamp into the rail. This is a game-changer for kitchen islands or dining tables where you might want to shift the furniture layout later.
| Fixture Type | Best Use Case | Lighting Effect |
|---|---|---|
| Spotlight | Art galleries, retail displays | Focused & Adjustable |
| Linear Module | Modern living rooms, corridors | Soft & Even |
| Pendant | Dining tables, bars, bedside | Decorative & Functional |
| Grille Light | Home offices, study areas | Anti-glare & Precise |
Essential Connectors and Accessories
To build a truly seamless magnetic rail tracking light layout, you need the right hardware to bridge the gaps. These accessories aren’t just decorative; they are the backbone of your system’s electrical continuity and structural integrity.
L, T, and X Shape Corner Connectors
Corners are where most lighting designs get complicated, but magnetic systems simplify the process. We use specialized connectors to maintain a constant power flow around bends:
- L-Connectors: Perfect for 90-degree turns between walls or ceiling-to-wall transitions.
- T-Connectors: Ideal for branching a single track into two different directions.
- X-Connectors: Used for creating grid-like patterns or cross-sections in large open spaces.
Power Feeds and Joiner Couplers
The power feed is the entry point where your DC48V transformer connects to the rail. If your design exceeds the length of a single track, joiner couplers (both internal and external) act as the mechanical and electrical bridge between sections. Ensuring a tight fit here is critical for flicker-free performance. If you are transitioning from older lighting styles, understanding the hardware differences in this H-track lights complete guide can help you appreciate the streamlined nature of magnetic couplers.
Track End Caps and Suspension Kits
Details matter for both safety and aesthetics.
- End Caps: These provide a clean visual finish and prevent accidental contact with the internal copper busbars.
- Suspension Kits: For high ceilings or “floating” designs, aircraft cables and adjustable grippers allow you to hang the rails at the perfect height.
Using high-quality accessories ensures your magnetic rail tracking light setup remains stable and professional, much like the standards found in high-end indoor LED lighting UK installations.
| Accessory Type | Primary Function | Installation Spot |
|---|---|---|
| L-Joiner | 90° Cornering | Ceiling Corners |
| I-Joiner | Linear Extension | Mid-track |
| End Cap | Safety & Aesthetics | Rail Terminals |
| PC Cover | Dust Protection | Empty Rail Slots |
Installation Guide for Magnetic Rail Systems
Installing a magnetic rail tracking light system is surprisingly simple if you follow a logical workflow. Since these systems operate on low voltage, the focus is on proper driver placement and secure track mounting.
Wiring and Power Supply Configuration
The “brain” of your setup is the DC48V transformer. Unlike traditional high-voltage tracks, magnetic rails require a driver to convert your home’s AC power to safe DC48V.
- Remote Drivers: Best for a clean look; hide the driver in a cabinet, service hatch, or ceiling void.
- Integrated Drivers: These snap directly into the track like a light module—perfect if you don’t have a hidden space for a bulky transformer.
- Polarity Matters: Ensure your wiring matches the “+” and “-” indicators on the track to avoid circuit issues.
Mounting the Track to Different Surfaces
The mounting method depends entirely on your ceiling type and the aesthetic you want to achieve for your specific lighting applications.
| Mounting Type | Best For | Installation Tip |
|---|---|---|
| Recessed | New builds / Gypsum ceilings | Requires a cutout; the track flange is plastered over for a “trimless” look. |
| Surface Mount | Concrete ceilings / Renovations | Screwed directly into the surface; no cutting required. |
| Suspended | High ceilings / Offices | Uses aircraft cables to hang the rail at a specific height. |
Inserting and Positioning Light Modules
The biggest perk of a magnetic rail tracking light is the tool-free adjustment. Once the track is powered, adding lights is a “click-and-play” process.
- Magnetic Snap: Simply press the module into the rail. The powerful magnets hold it securely while the copper pins make an instant electrical connection.
- Hot-Swapping: You can move, add, or remove fixtures while the power is on without any risk of electric shock.
- Flexibility: If you change your room layout, just slide the spotlight or linear module to a new position on the track. This level of versatility is why magnetic systems are outperforming traditional **halo track lighting in modern interior design.
Magnetic Track Lighting Buying Guide
When you are ready to invest in a system, this magnetic rail tracking light buying guide will help you navigate the technical specs. We design our systems to be future-proof, but getting the foundation right is critical for long-term performance.
Choosing Between DC48V and High Voltage Systems
For modern architectural applications, we almost exclusively recommend low-voltage systems over traditional mains voltage tracks. Our magnetic rails operate on 24V DC or 48V DC, representing a significant upgrade from older technologies.
- Safety First: 48V systems are touch-safe. You can reposition fixtures while the power is on without any risk of electric shock, making maintenance effortless.
- Aesthetics: Low voltage allows for much thinner, “pencil-thin” track profiles that blend seamlessly into drywall or concrete.
- Efficiency: DC power runs cooler and is more efficient for LED longevity.
| Feature | DC48V Magnetic System | Traditional High Voltage (110/220V) |
|---|---|---|
| Safety | Touch-safe (Low Voltage) | Shock Risk (Requires Power Off) |
| Profile Size | Slim, Minimalist | Bulky, Industrial |
| Installation | Tool-free Magnetic Click | Mechanical Twist & Lock |
| Dimming | Digital (DALI/Zigbee) | Phase Dimming (Often limited) |
Calculating Power Requirements and Driver Capacity
To ensure your system runs smoothly, you must size your power supply (driver) correctly. Do not simply match the numbers exactly; you need headroom to prevent overheating and ensure longevity.
- Sum the Wattage: Add up the wattage of every magnetic module you plan to use on a single circuit (e.g., 5 spotlights at 10W each + 2 linear floods at 20W each = 90W).
- Add Buffer: We recommend adding a 20% safety buffer.
- Calculation: 90W x 1.2 = 108W.
- Select Driver: Choose a 48V power supply that meets or exceeds 108W (e.g., a 150W driver).
Pro Tip: If your track run is very long (over 10 meters), you may need to inject power from both ends to prevent voltage drop, which causes lights at the far end to look dimmer.
Selecting Color Temperature and Dimming Options
The versatility of a magnetic system lies in its control. Whether you are lighting a cozy home or setting up a display for retail lighting manufacturers, the light quality matters.
- Color Temperature (CCT):
- 3000K (Warm White): Best for residential living rooms and hospitality.
- 4000K (Natural White): Ideal for offices, kitchens, and commercial displays.
- Tunable White: Allows you to adjust from warm to cool via a controller.
- Color Rendering (CRI): Always aim for CRI >90. This ensures colors look true to life, which is non-negotiable for high-end interiors.
- Dimming Protocols:
- DALI-2: The professional standard for individual fixture control.
- ZigBee/Tuya: Great for smart home integration and wireless app control.
- 0-10V: A reliable standard for simple dimming requirements.
Choose the protocol that integrates with your existing building management system or smart home hub.


 English
  French
  Arabic
  German
  Spanish
  Italian
  Portuguese
  Esperanto
  Greek
Greek  Finnish
Leave A Comment